partiton of files into archives
|
 |
The screenshot on the left shows
the start-up screen of Packager MK1. The result
of splitting up files is to be called
"archive" in the following. The red
numbers inside the screenshots mark the
accompanying explanation.
For
partition of files, click on button (1).
If
you want to restore the split up files, click at
button (2).
|
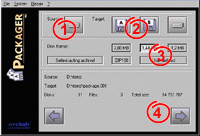 |
First,
you have to select the source of the file(s). By
clicking at the "source"-symbol (1)
you open the "select-file-dialog", from
which you can choose a file. If you want to
choose more than one file: click at the first
file and press the "ctrl"-key; you can
select further files by keeping pressed the
"ctrl"-key an click at these files.
The second step is to choose a target drive for
the archives (2). Click either
at the symbol for disk drive A or B! To select
another drive (hard disk etc.), click at the
symbol right beside "disk drive B". |
As archive name you can (but you needn't)
keep "packager.001" for the archive, which is
automatically shown by the "save-as-dialog".
In the section "disk format" (3)
you can select the desired archive size by clicking at
these buttons. Standard type is "1.44 MB" for
high-density disks. This means the archive you create fit
in a 1.44MB disk. You can also select "2.88 MB"
an "1.2 MB" disks or "ZIP100" for the
Iomega ZIP Drive by clicking at these buttons. If you
want to choose a different archive size, you have to
click at the buttons "user-defined".
The button
"Selfextracting archive" creates as first
archive a self-running .EXE file. To restore the original
source file(s), you won't need Packager MK1 then! In this
case you simply have to start the first .EXE archive!
If the
error-message "not enough diskspace" is shown,
it means there is still some data on the disk. To get
enought space, select the item "system",
"format drive" from the menu. Through this menu
item it is also possible to start Windows-Explorer.
The section below (3) shows a summary of
your input. You can now proceed by clicking button (4).
 |
In
the section (1) a list of the
selected file(s) is shown. Section (2)
shows the progress of the partition. Below that,
you'll see the request to insert disk 1. If a
floppy disk is your target drive an you haven't
yet done so, insert disk now! If you have chosen
a hard disk as target, this step is obsolete.
Now you can start the partition through a click
at the "GO" button. Insert, if
necessary, one disk after the other when the
requests to do so are shown on the screen. After
the partition is finished a new window appears. |
design
& concept by arclab / copyright 1999 arclab software
GdbR
all brand
names and trademarks are the property of their respective
owners
Alle Warenzeichen und eingetragenen Warenzeichen sind
Eigentum der jeweiligen Inhaber
|
